
3 Tips for Avoiding Back Pain and Preventing Injury
Many people come to us at Energy For Life, mentioning that they often experience lower back pain. Globally it’s recognised as a huge issue – according to a report published in The Lancet, lower back pain affects a staggering 540 million people at least. This is more than 1 in 10 people. It has also been estimated by experts that back pain (lower and upper) will affect 80% of the population at some point in their lives. We too have experienced this first hand at various points in our lives and so we are acutely aware how restrictive and energy draining back pain can be and of the importance of preventative measures to protect us all against it?
Below are our top three tips to ensure we are not in the 1 in 10 camp and can go about our days pain free. An essential part of having “Energy For Life”, the energy to live our life well.
Tip 1: Use stretching to lengthen your hamstrings:
The hamstrings are located at the back of the thighs and are made up of three long large muscles called the semitendinosus, the semimembranosus, and biceps femoris. They run from the back of the pelvis to the back of the knee and their job is to help the knee bend and enable extension of the hip. They are also crucial in aligning the pelvis and the spine and stabilising the spine in movements such as a forward fold.
If our hamstring muscles are tight, the postural alignment of the spine and the pelvis in relation to each other change. This can place undue stress on the lower back and/or the hips, knees and ankles, causing pain.
So, creating a consistent stretching habit for the hamstrings, as is incorporated into the movement scheduling at Energy For Life is an amazing strategy to remedy already existing pain, as well as insure us against future issues. The intention is to gradually lengthen and reduce tension in the hamstring muscles which will reduce the stress felt in the lower back.
Here are our three biggest “bang for our buck” hamstring stretches:
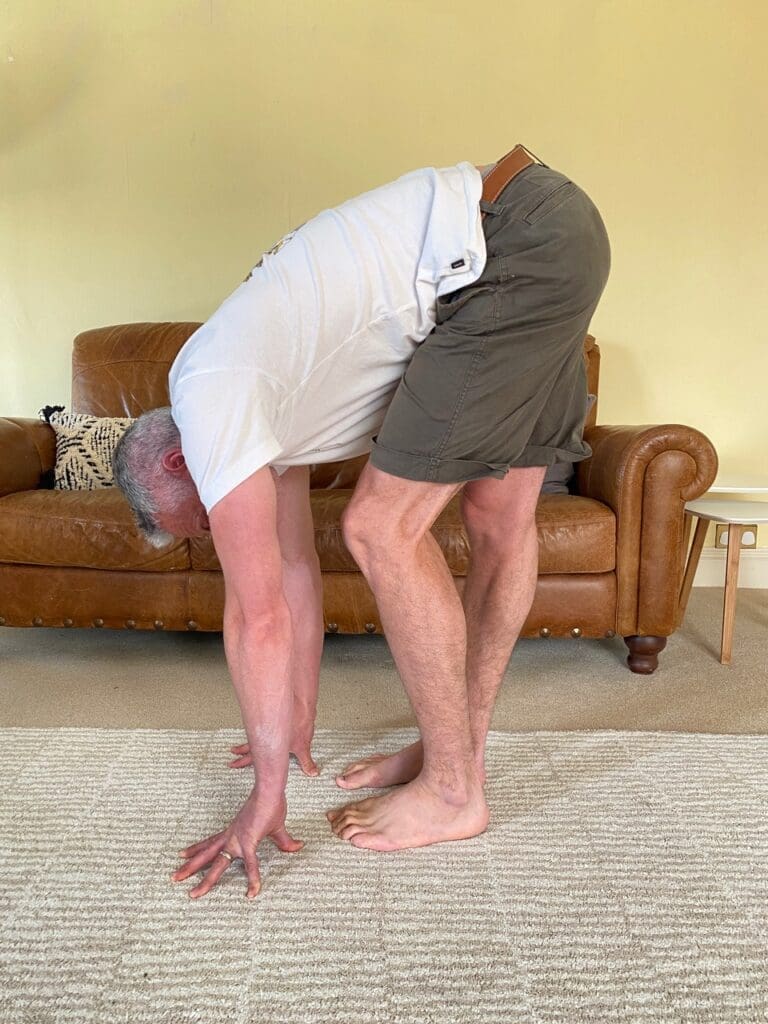
Elephant Walks
- 1. Stand with your feet at hip width and slightly bent knees, then lean forwards from the hips and support yourself with your hands on your knees. If you already feel a strong stretch through the hamstrings / back of knee then this angle is probably a good starting position. If you don’t feel a stretch, then continue leaning forward from the hips until you do. At this point, your hands may be able to rest on the floor in front of your feet. If not, rest them on a pile of books or yoga blocks, a low stool or a coffee table.
- 2. Push one knee backwards trying to straighten the leg whilst the other leg remains bent. Then return to the starting position and push the other knee backwards. This should be a slow, controlled movement from side to side. Repeat for 50-100 leg bents.
- 3. After 20 reps or so, you may feel like your hamstrings have loosened and you can lean further over with your torso so you might want to change the height of the surface your hands are resting on.
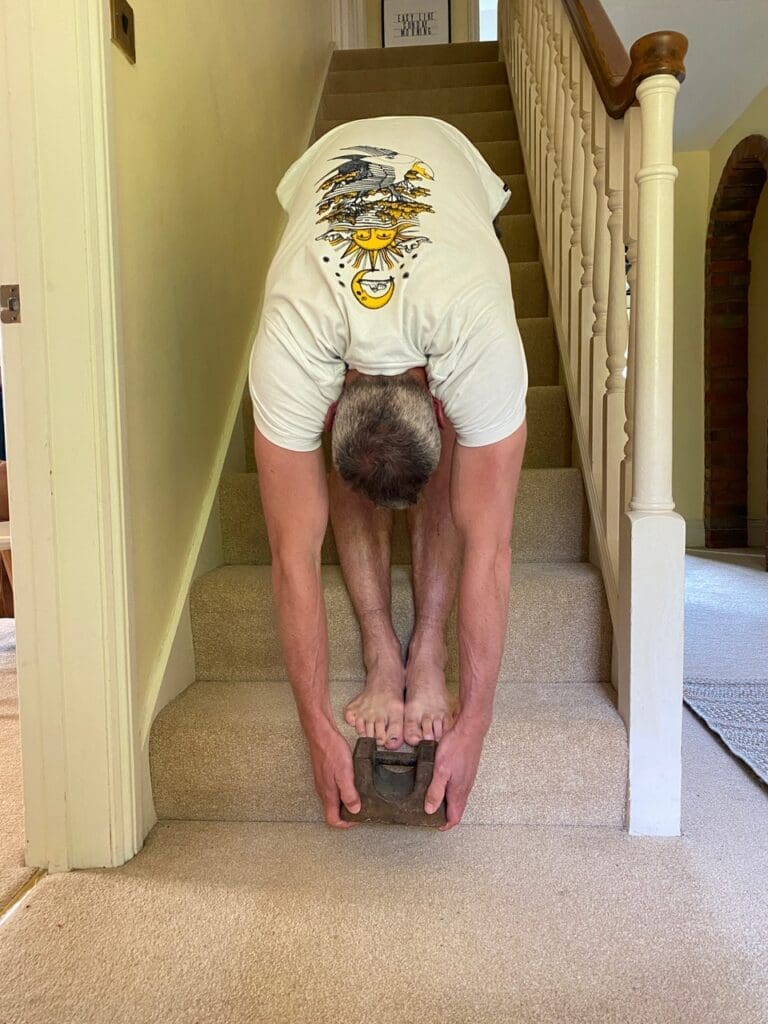
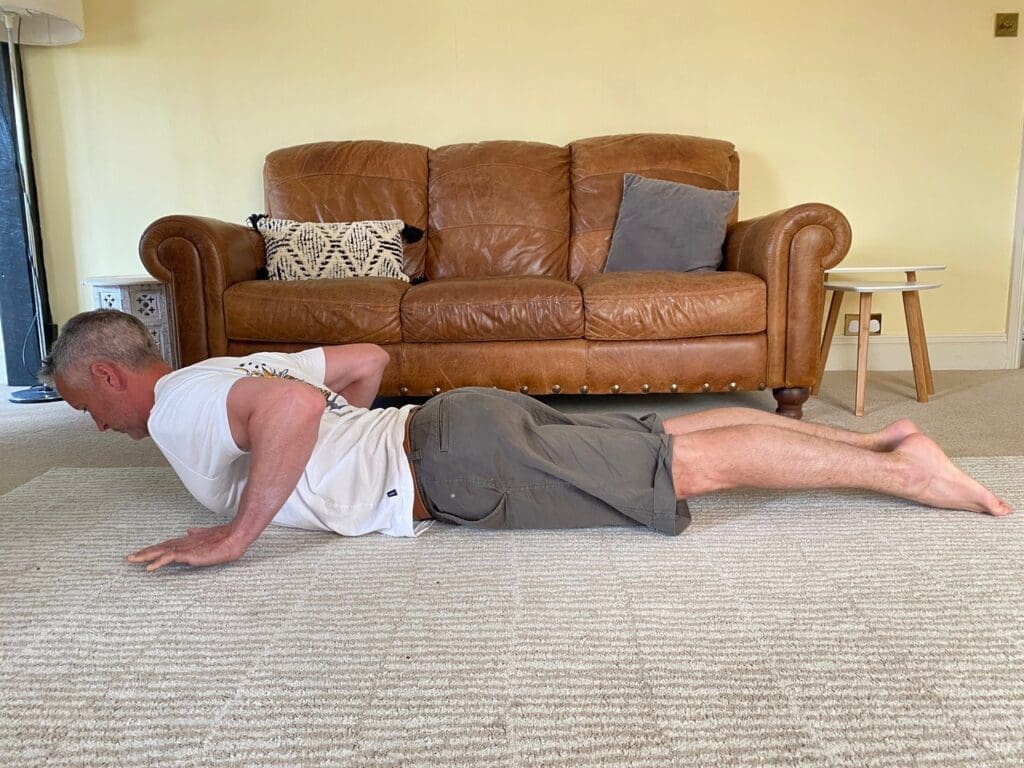
Weighted Jefferson Curls
- 1. For this exercise you will need to start with a light weight around 3-5kg that you can hold in your hands.
- 2. Also, if you can perform a standing forward fold and get your fingers to the floor, you will need to stand up on a step, sturdy bench, plyo box or stack of weight plates. If you can’t touch the floor in a standing forward fold, you can begin this exercise standing on the floor.
- 3. With your feet at hip width and a light weight in your hands, stand up as tall as you can with good posture and straight legs.
- 4. Start flexing your spine forwards, begining with your neck by tucking your chin to your chest, then rounding your shoulders and upper back forwards, curling down towards the floor.
- 5. Keep the hips in a neutral position as you continue rounding down through your spine into your lower back and as late as possible, let the pelvis tilt backwards so you can fold as far forwards as possible with straight legs, using the weight to pull you into the stretch. Make sure the weight is still hanging freely in the air at the bottom of the movement, not resting on the floor. If its on the floor you need to stand on something higher.
- 6. From the bottom of the movement, engage your core and slowly roll up through your spine starting with your lower back, into your middle back, upper back, shoulders and your head comes up last. Repeat these reps slowly for up to 60-90 seconds and repeat for 2-3 sets.
- 7. As you adapt to this exercise, you should increase the weight you hold in small increments.
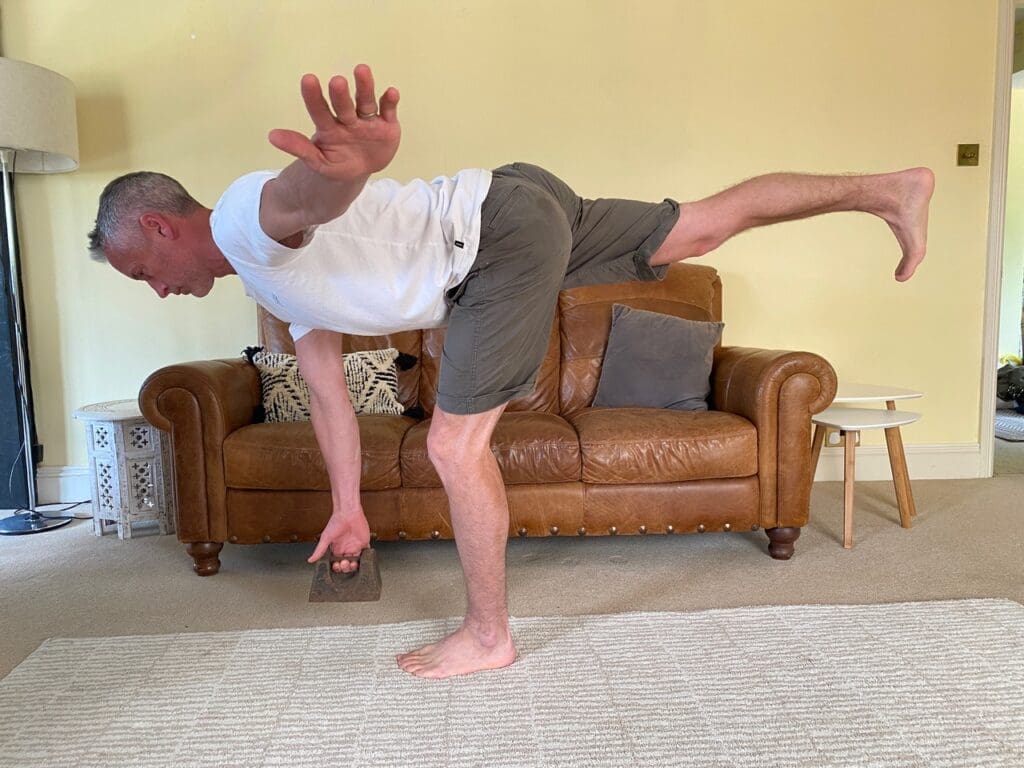
Single Leg Romain Deadlifts
This is a simple yet challenging exercise that should be mastered with just body-weight first, then once the technique is strong, add a small hand-held weight to increase the loading.
- 1. Start by standing with the feet hip-length/width apart and parallel.
- 2, Slowly lift one leg up behind you and at the same time lean forward from the hips, keeping a straight back. Imagine a solid line from your back heel to the top of your head as you tilt forwards until your body forms a ‘T’ shape from the side.
- 3. In the body-weight version, aim to get both hands to touch the floor with only a small bend in the standing leg. Keeping your shoulders and upper back engaged, slowly lower your extended back leg and lift your torso to return to the upright starting position. Repeat the process for 4-8 reps on one leg, then swap to your other leg.
- 4. When you are ready for the weighted version, hold the weight in the same hand as the leg that lifts up behind you and aim to get the weight close to the floor without letting it land on the floor on each rep.
If you’re regularly coming to training at Energy for Life then effective stretches will already be incorporated into our classes, but it never hurts to spend extra time improving your mobility so we recommend making a mobility routine a daily DIY habit so it happens on the days you don’t come to class or if you are away for a period of time too.
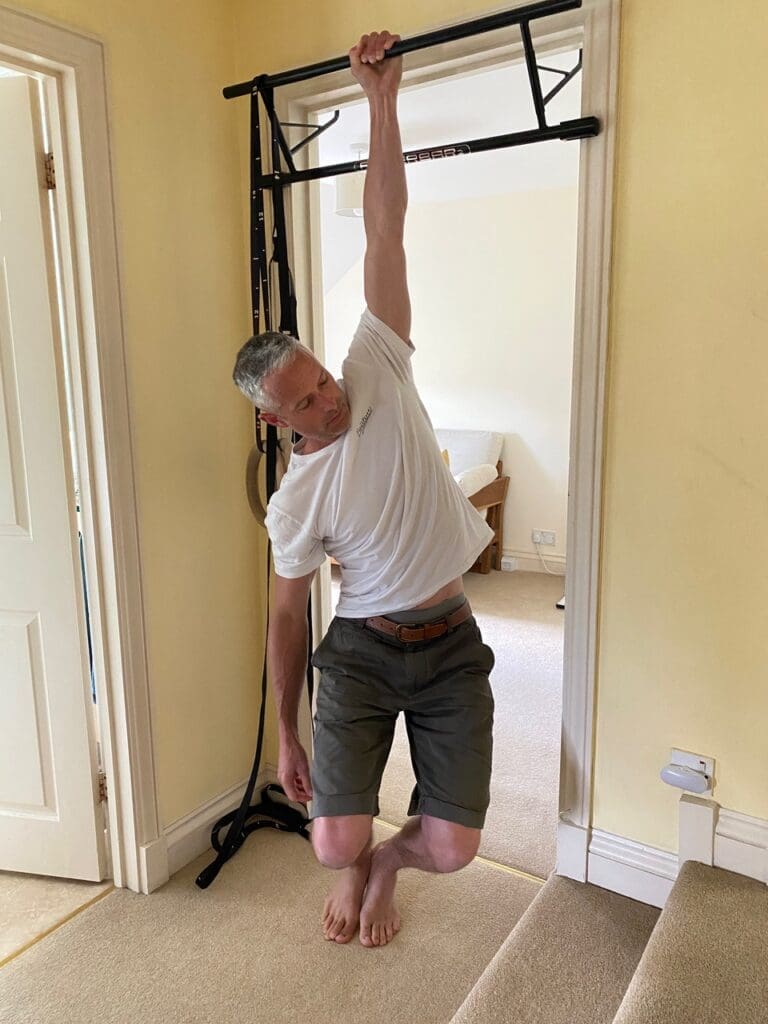
Tip 2: Incorporate hanging into your daily routine
Hanging is a really amazing exercise to decompress the lower spine as well as lubricate, hydrate and nourish the intervertebral discs of our spine – doesn’t that sound yummy? So what’s going on beneath the skin to allow that? Well, when we passively hang, we allow the shoulders to rise up to the ears which provides an incredible stretch for our latissimus dorsi muscles (known as the lats). These are the big v-shaped muscles that connect our arms to our spine and pelvis, providing spine stability, shoulder and back strength.
Many of the movements we make through the day are compressive in nature, even simply sitting at our desk, so this decompressive exercise can be really impactful and ensure our lower back stays stretched, lubricated and healthy.
As with all exercises, we want to think about progressing into the full version of the movement slowly over weeks and months, rather than minutes. Going for a full hang with your feet off the floor will be a huge load for your lats so please follow the progressions below to ensure you don’t overload the body.
Pull-up bars can be brought easily and fairly cheaply and can neatly sit across one of your home door frames. But you can get started today by simply putting a folded towel over a door to protect your hands and hang on that.
Version 1: Feet on the floor
- 1. Gripping over the door or a bar, start to allow some of your weight to hang through your arms, reducing the amount of load taken through your legs.
- 2. Let your shoulders come up around your ears and let your head nestle between them. For the first version, we want to still have the feet on the ground for support but slowly lighten the weight going through the feet.
- 3. Aim to hold for 15 seconds to begin. Over days and weeks progress to 1 and a half minutes in total and slowly decrease the support provided by the feet.

Version 2: Feet off the floor
The same as version 1 with the full body weight going through the arms (feet off the floor).
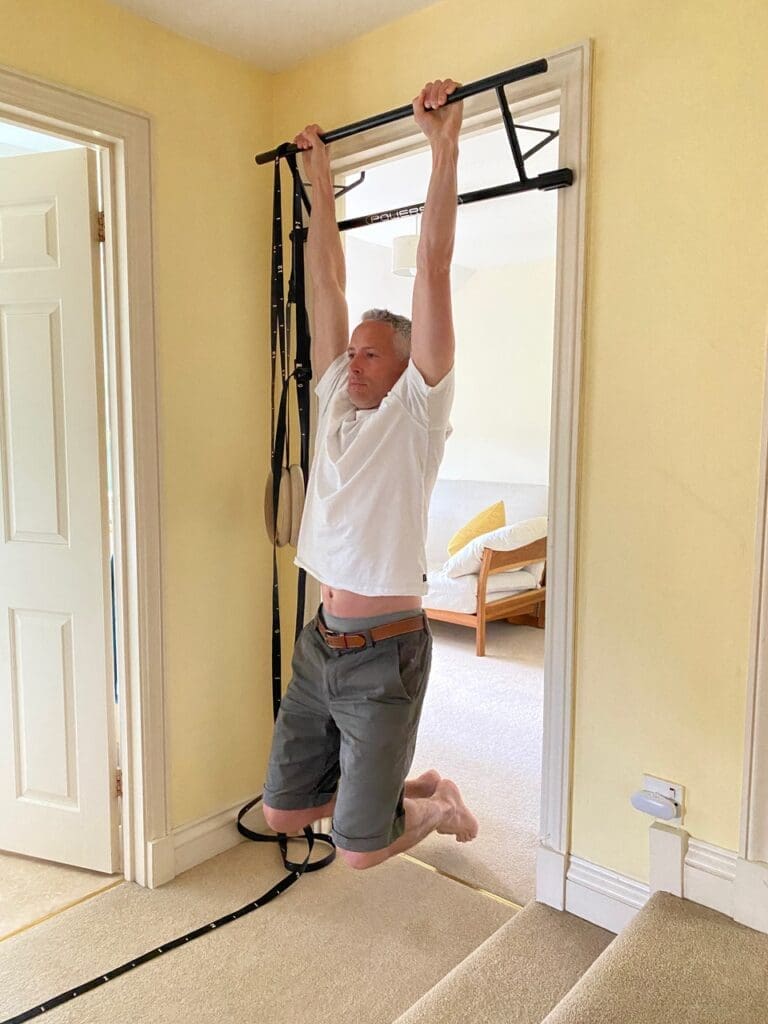
Version 3: Single Arm Hanging (feet on, then feet off)
Progress from version 2 to hanging with only one arm attached to the bar. Again, progress slowly so that you start by reducing the support of the second hand bit by bit. You can also return to having the feet on the floor as you build up your single arm hanging strength.
Tip 3: Build strength to protect your lower back
The stronger we can be around our lower back the better it is for reducing back pain and preventing injuries that cause pain. This doesn’t mean having to lift super heavy weights either. In fact, most lower back injuries occur lifting everyday objects up from the floor at awkward angles, usually when flexing the spine forwards and moving it through rotation (twisting left or right) at the same time. So it is important to strengthen your spine through flexion and extension, and side flexion / extension as well as rotation.
Here are our favourites from across our yoga, Pilates and strength fitness classes:
Cobra Pose From Yoga
- 1. Lie on your stomach with hands underneath your shoulders or beside the ribs.
- 2. Engage your legs by pushing your feet into the floor.
- 3. Gently pull the belly button up toward the spine while lifting your chest off the ground.
- 4. Squeeze your shoulder blades together to pull the shoulders back and down.
- 5. Stay lifted for a few breaths before releasing slowly to the floor, repeat for 30 to 60 seconds total, or incorporate into a yoga flow such as downward facing dog, to high plank, chaturanga, lowering to the floor, then extending up into cobra, before pressing back to downward facing dog.
For more details on yoga poses head to https://www.energyforlifefitness.com/yoga-brighton/
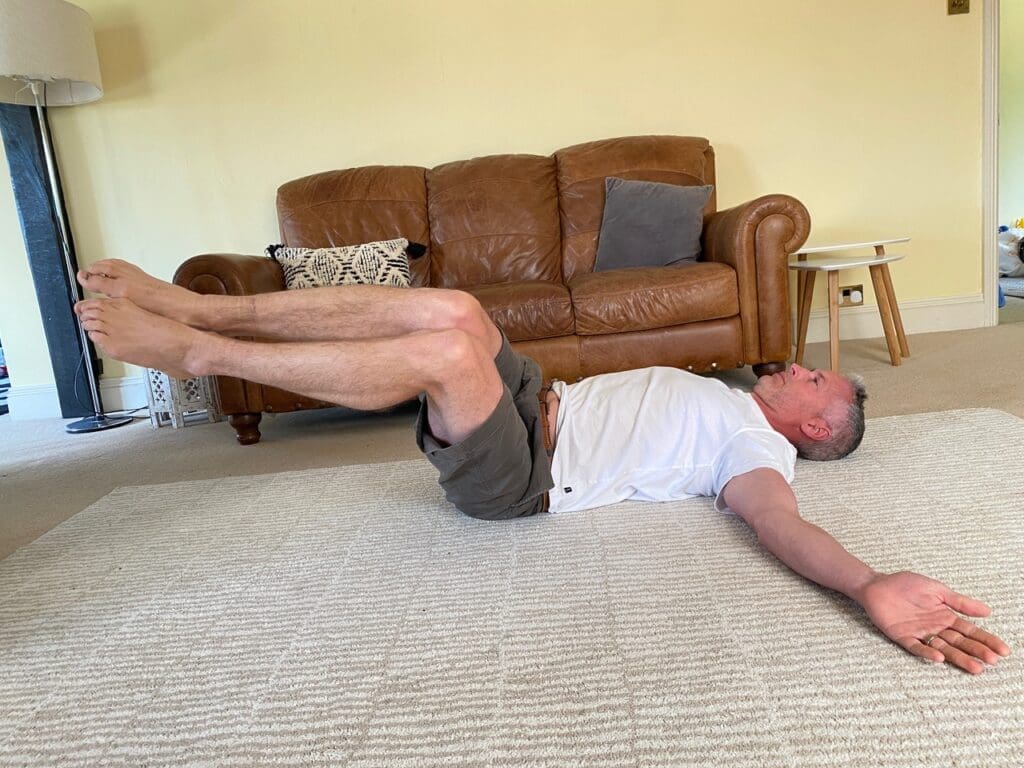
Supine Twist From Pilates
- 1. Lie on your back, with your legs up in tabletop position (knees are directly above your hips and shins parallel to the floor). Have your arms wide in a T position, palms facing up. Tilt your pelvis forwards so your lumbar spine is pressing into the floor.
- 2. Exhale and pull the abdominals down, gently squeezing the inner thighs together.
- 3. Inhale and rotate your spine and pelvis, lowering the legs slowly out to one side.
- 4. Exhale and rotate legs back to the middle.
- 5. Inhale and repeat the process to the other side.
- 6. Repeat the sequence five times alternating sides.
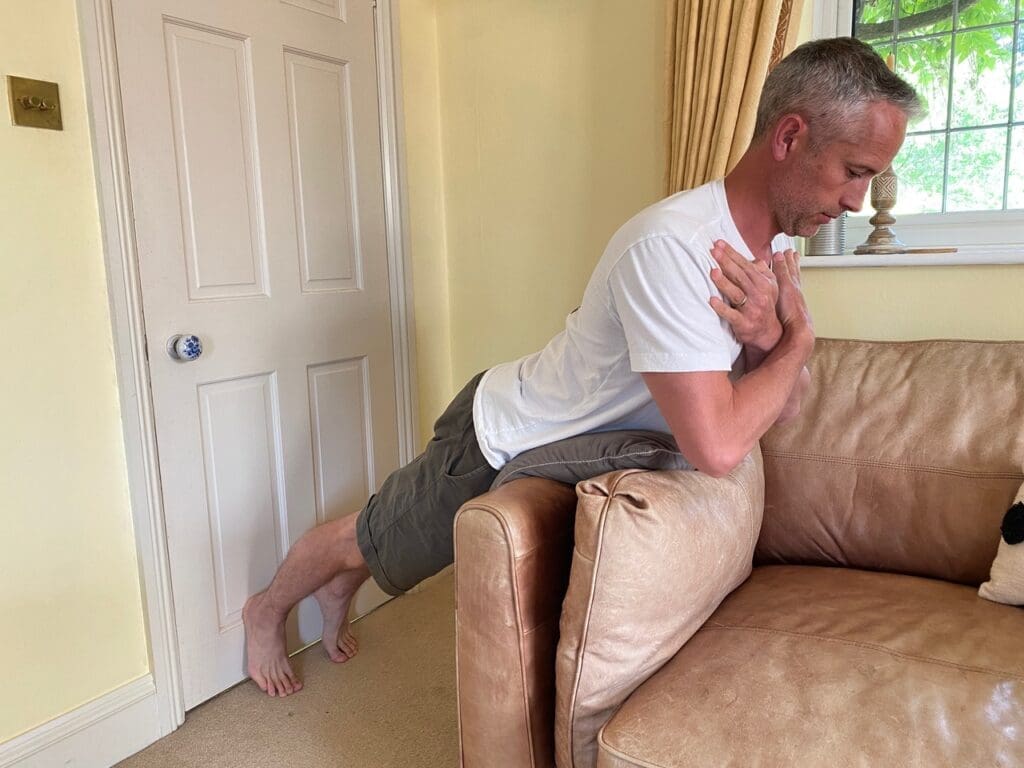
From Strength & Fitness – Incline Back Extensions
Setting up for this exercise is a bit more involved, gyms often have specific padded frames that help you get your body at an angle and provide some way of anchoring your feet. That being said with a little inventiveness and some lounge furniture it can easily be done at home.
- 1. Set up a sturdy, padded arm chair side on and 1m away from a wall. For more padding you can put additional cushions over the arm nearest the wall
- 2. With your feet wedged against the wall rest the front of your hips over the arm of the chair, use your arms to support your body weight
- 3. Then hinge from the hips to lower your upper body down towards the seat of the chair.
- 4. Engage your hips and lift through your chest to extend your spine upwards and lift your torso up away from the seat.
- 5. Slowly lower your body back down and repeat this movement for 8-12 controlled reps.
- 6. As you get stronger you can progress the movement by folding your arms across your shoulders, or holding them overhead, or using them to hold a weight plate across your chest.
Seated Good Mornings
- 1. Sit down on a sturdy bench or chair with you feet flat on the floor at shoulder width. You can use your arm position to make the exercise easier or harder, so for level 1, have your hands on your waist.
- 2. Keeping a neutral spine and avoiding rounding through the upper back, hinge forwards from the hips until your spine is as close to parallel with the floor as you can get it.
- 3. From there, lead up with the chest, lifting your torso back to upright. Move up and down slowly with control, feeling the stretch of the back and hamstrings on the lowering and the contraction of the extensions down the sides of your spine as you lift back up again. Repeat for 8-12 reps over 2-3 sets.
- 4. To progress, take your hands off your waist and place them across your shoulders (level 2). From there, interlace them behind your head (level 3) or reach them out overhead (level 4). Then increase the load by holding weights in your hands or a weight plate at chest level or a barbell across your shoulders.

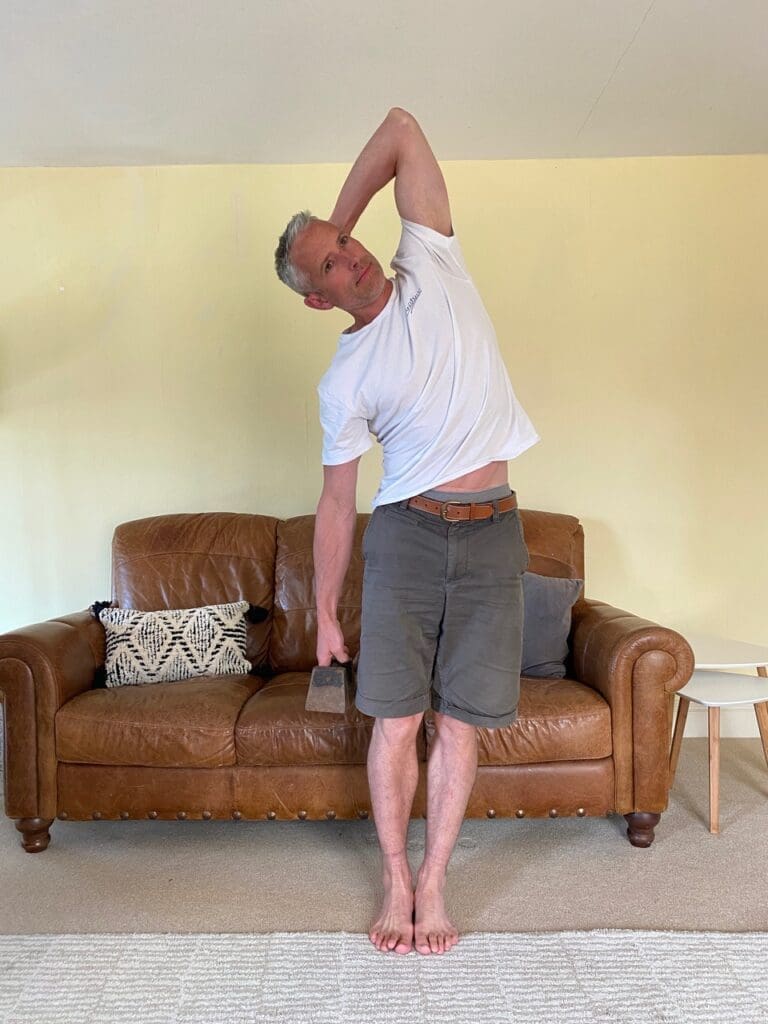
Weighted Side Flexion
- 5. Stand upright with good posture and your feet at hip width, holding a weight in one hand, then put your other hand up behind your head (this will increase the stretch effect on the non-weighted side).
- 6. Lean slowly down to the weighted side, allowing the weight to help lower you down, but make sure you don’t bend forwards or back or turn the shoulders.
- 7. When you get as far down as you can with straight legs, engage the side body muscles on the non-weighted side (think obliques and quadratus lumborum (QL)) to bring you back to upright and then over to the other side, bending away from the weighted side. Repeat the exercise slowly for 8-12 reps then swap the weight to the other hand and repeat on the other side for 2-3 sets.
Conclusions
Whether we’ve experienced it first hand or not, we all know someone who has and back pain is debilitating and draining. Yet with a relatively small amount of effort, done consistently over months and years, exercises like those we’ve described above can act as an insurance policy for a life without back injury and pain. Leaving you healthy and active to get out there and enjoy life.